If you’ve ever had a craving for peach pie but realized fresh peaches are either rock hard or way out of season, this peach pie with canned peaches recipe is about to save the day. I make this one year round, especially when I want that classic peach pie flavor without the peeling, slicing, and sticky mess all over my counter.
This pie is cozy, lightly spiced, and perfectly jammy, not soupy and not dry. I tested it a few times to get the filling thick enough without turning gummy, which is honestly the biggest struggle with canned peaches. The good news, it’s very forgiving and beginner friendly.
You don’t need fancy tools or pastry school skills. If you can stir, pour, and crimp a crust with your fingers, you’re golden. This recipe is for busy families, tired moms, and anyone who wants a homemade dessert that actually works.
Why you’ll love this Peach pie with canned peaches recipe
The filling sets beautifully, no watery slices sliding all over the plate
Uses canned peaches, so it works any season, no waiting on ripe fruit
Sweet but balanced, not cloying or overly sugary
The cinnamon and vanilla bring warmth without overpowering the peaches
Beginner friendly, no complicated techniques or stress
Easy to customize with lattice or classic top crust
Tastes even better the next day, which makes it great for make ahead desserts
Tips for success
The most important thing I learned while testing this peach pie with canned peaches recipe is to drain the peaches really well. I’m talking several minutes in a colander, then a gentle pat with paper towels. Extra liquid is the fastest way to a soupy pie, and nobody wants that.
Cornstarch is your best friend here, but don’t overdo it. Too little and the filling won’t set, too much and you’ll get that weird gel texture. Stick to the amount in the recipe and you’ll get clean slices after cooling.
Bake until the crust is deeply golden and the filling is bubbling in the center, not just around the edges. Bubbling means the cornstarch has activated. If the crust browns too fast, loosely tent it with foil. I do this almost every time.
Let the pie cool for at least 3 hours. I know it’s hard, but cutting too early will undo all your hard work. Warm is fine, hot is not.
Nutrition and health notes
Peach pie is a dessert, not a health food, and that’s okay. Peaches themselves provide vitamin C, vitamin A, and small amounts of fiber, even when canned. According to the USDA, canned peaches packed in juice retain many of the same nutrients as fresh peaches, especially when not stored in heavy syrup.
Using canned peaches in juice instead of syrup helps control added sugar. You can also slightly reduce the sugar in the filling without hurting texture, which I tested successfully. Butter and crust contribute saturated fat, so this is best enjoyed in moderation.
If you’re watching portion sizes, serving the pie with fresh fruit or a lighter dessert earlier in the day can help balance things out. For general peach nutrition, you can check the USDA FoodData Central website, which is a reliable source for ingredient nutrition information.
Serving ideas and pairings
Serve warm with vanilla ice cream or whipped cream
Once baked and fully cooled, this pie can be stored covered at room temperature for up to one day. For longer storage, keep it in the refrigerator for up to 4 days. I usually cover it loosely with foil to keep the crust from getting soggy.
You can freeze the fully baked pie. Wrap it tightly in plastic wrap, then foil, and freeze for up to 2 months. Thaw overnight in the fridge and warm in a 325°F oven until just heated through.
For make ahead, you can prepare the filling and store it in the fridge for up to 24 hours. Assemble and bake when ready for best texture and flavor.
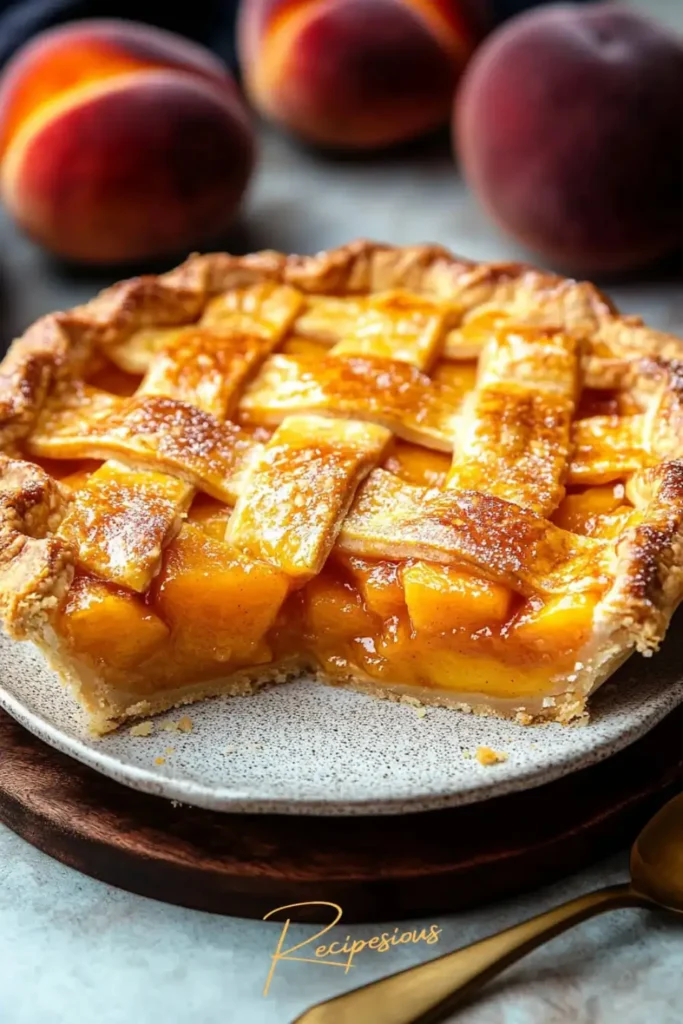
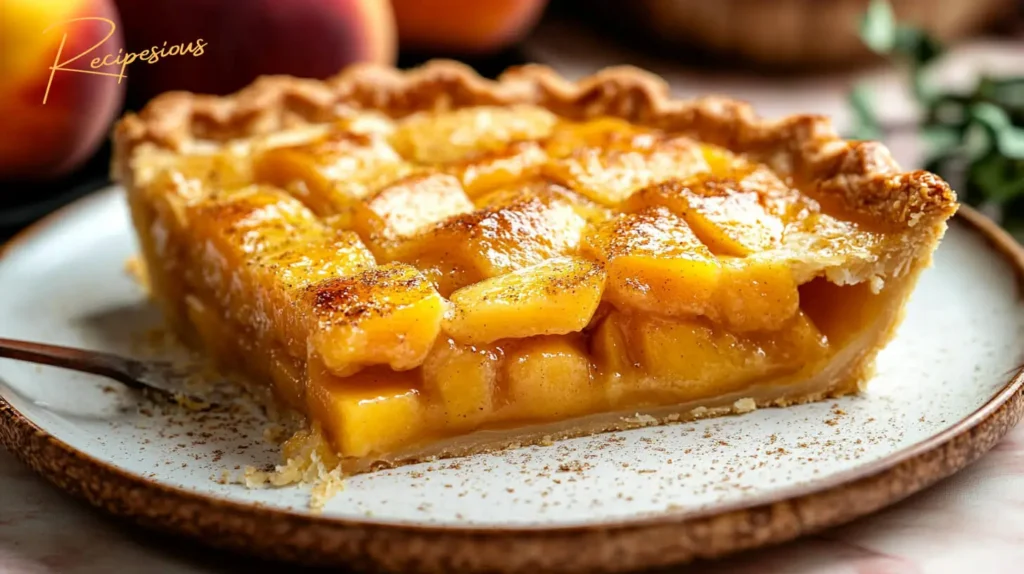
This peach pie with canned peaches recipe delivers a classic American dessert with a flaky crust and a sweet, cinnamon-kissed peach filling made easy using pantry-friendly canned peaches.
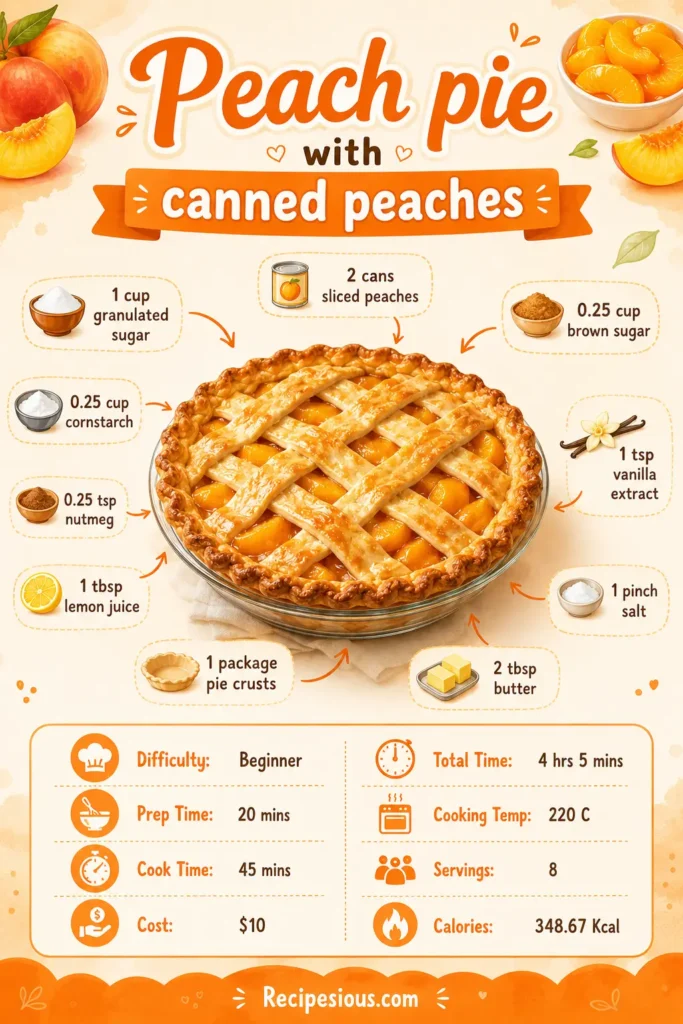
Ingredients
2cans Sliced peaches (15 oz each, packed in juice, very well drained)
1cup Granulated sugar (Adjust slightly if peaches are very sweet)
0.25cup Brown sugar (Adds depth and warmth)
0.25cup Cornstarch (Thickens the filling)
1tsp Cinnamon (Classic peach spice)
0.25tsp Nutmeg (Optional but recommended)
1tbsp Lemon juice (Brightens canned peaches)
1tsp Vanilla extract (Rounds out the flavor)
1pinch Salt (Balances sweetness)
2tbsp Butter (Cut into small pieces)
1package Pie crusts (Double crust, homemade or store-bought)
Instructions
1
Prep the oven and crust
I start by preheating the oven to 220°C. Roll out one pie crust and fit it into a 9-inch pie dish. Gently press it into the corners without stretching it, stretching leads to shrinkage later, ask me how I know.
2
Drain the peaches really well
This step matters more than you think. Drain the canned peaches in a colander for at least 10 minutes. I even pat them lightly with paper towels. Extra liquid equals soupy pie, and we’re not doing that today.
3
Make the filling
In a large bowl, stir together the sugar, brown sugar, cornstarch, cinnamon, nutmeg, and salt. Add the drained peaches, lemon juice, and vanilla. Gently toss until everything is evenly coated. The mixture should look glossy but not watery.
4
Assemble the pie
Pour the peach filling into the prepared crust and spread it out evenly. Dot the top with the small pieces of butter. Cover with the second crust, either full or lattice. Trim excess dough and crimp the edges. Cut a few small slits if using a full top crust so steam can escape.
5
Bake until bubbly
Bake at 220°C for 15 minutes, then reduce the oven to 190°C and continue baking for 30 to 35 minutes. You’re looking for a deep golden crust and bubbling filling in the center, not just the edges. If the crust browns too fast, loosely tent with foil.
6
Cool before slicing
This part takes patience. Let the pie cool for at least 3 hours before slicing. I tested cutting it early and yes, it tasted good, but it did not hold its shape. Cooling lets the filling fully set.
Nutrition Facts
Servings 8
Amount Per Serving
Calories348.67kcal
% Daily Value *
Total Fat10.24g16%
Cholesterol7.63mg3%
Sodium143.77mg6%
Potassium146.9mg5%
Total Carbohydrate65.39g22%
Dietary Fiber2.27g10%
Sugars45g
Protein1.44g3%
Vitamin A 45.51 mcg
Vitamin C 3.57 mg
Calcium 14.89 mg
Iron 0.81 mg
Vitamin E 0.68 mg
Vitamin K 2.35 mcg
Vitamin B6 0.03 mg
Phosphorus 27.91 mg
Magnesium 9.27 mg
Zinc 0.18 mg
* Percent Daily Values are based on a 2,000 calorie diet. Your daily value may be higher or lower depending on your calorie needs.
Note
Why canned peaches work: I tested this side by side with fresh peaches in the off-season, and canned peaches actually gave more consistent results when drained properly.
Too runny: Next time, your peaches probably weren’t drained enough or the pie didn’t cool long enough.
Too thick: Cut the cornstarch back by 1 tablespoon if you prefer a softer filling.
Flavor boost: A tiny pinch of ground ginger adds warmth without stealing the spotlight.
Make it ahead: This pie tastes even better the next day once the flavors settle.
Storage tip: Cover loosely and refrigerate for up to 4 days. Reheat slices briefly in the oven for best texture.
Pin this recipe to share with your friends and followers.
Alex Richardson
Food and Lifestyle Blogger
Hi, I’m Alex - a full-time food blogger, proud Dad of two wonderful boys, and a New York husband with a taste for adventure! I’m here to whip up recipes, juggle family life, and explore the world, one delicious dish at a time (usually with a little help from my taste-testing team at home!).