This sour cream biscuit recipe came out of pure necessity on a weekend morning when I realized I was out of buttermilk and still promised warm biscuits. I wasn’t about to run to the store in pajamas, so I started experimenting with what I had. Sour cream turned out to be the quiet hero, adding tenderness, moisture, and just enough tang to make these biscuits taste special.
I tested this recipe a few times, changing the fat ratio, adjusting oven temperature, and even testing different mixing methods. What I learned is that sour cream gives you a lot of forgiveness. The dough stays soft, the biscuits rise well, and the texture stays fluffy without being crumbly.
These biscuits take about 30 minutes from start to finish. Skill level is beginner friendly, no fancy tools required. They’re perfect for busy mornings, cozy dinners, or anytime you want homemade bread without a big production.
Why you’ll love this Sour cream biscuit recipe
- Soft, tender crumb with flaky layers
- Slight tang that balances the buttery flavor
- No buttermilk required
- Dough comes together quickly
- Bakes evenly with reliable rise
- Great for both sweet and savory meals
- Freezer friendly for make-ahead days
What I love most is how consistent these biscuits are. I’ve made them half-awake in the morning and still gotten good results. Once you feel the dough texture, you’ll know exactly when it’s ready.
Tips for success

The most common mistake with biscuits is overworking the dough. Biscuit dough should look a little shaggy and rough. If it looks smooth like bread dough, it’s been mixed too much and the biscuits will be tough.
Cold fat matters. Use cold butter and work quickly so it doesn’t melt into the flour. I tested one batch with softened butter and the rise was noticeably worse. Those little cold butter pockets are what create flaky layers.
Sour cream thickness can vary. If your sour cream is very thick, you may need a tablespoon or two of milk to bring the dough together. If it’s runny, add flour a little at a time until the dough holds.
When shaping, gently pat the dough instead of rolling it thin. Aim for about one inch thick. Thinner dough bakes faster but sacrifices height.
You’ll know the biscuits are done when the tops are lightly golden, the sides feel set, and the kitchen smells buttery and warm. If the bottoms brown too fast, move the pan to a higher rack.
Nutrition and health notes
Biscuits are comfort food, and that’s okay. This sour cream biscuit recipe uses simple pantry ingredients like flour, butter, and dairy, which provide energy and satisfaction. According to USDA FoodData Central, sour cream contributes calcium and fat, while butter provides fat-soluble vitamins like vitamin A
Sour cream adds moisture and tenderness, which means you don’t need as much butter as some traditional recipes. That balance helps keep the biscuits rich without feeling greasy.
These biscuits are filling, so smaller portions often feel satisfying. Pairing them with protein or vegetables helps balance the meal.
For food safety, baked goods with dairy should be stored properly and not left out for extended periods. The FDA recommends keeping homemade foods covered and stored at safe temperatures
This is homemade food meant to be enjoyed mindfully, not something to stress over.
Serving ideas and pairings
- Serve warm with butter and jam
- Pair with soups or stews
- Use as a side for delmarva bbq chicken
- Split and use for breakfast sandwiches
- Serve alongside eggs or sausage
- Pair with cunetto’s garlic cheese bread for a comfort-style dinner spread
- Add honey or gravy for a Southern-style meal
- Serve with bug juice camp drink for kid-friendly breakfasts
They also work beautifully as a base when you want something heartier than toast but easier than yeast bread.
If you enjoy baking comfort classics, you might also like SPRINKLE COOKIE RECIPE days with kids or a cozy dessert like STRAWBERRY CRUNCH CHEESECAKE RECIPE for special occasions.
Storage and make ahead

These biscuits store well if handled properly. Keep baked biscuits in an airtight container at room temperature for up to 2 days. For longer storage, refrigerate them for up to 4 days.
Freezing works great. You can freeze baked biscuits for up to 2 months. Thaw at room temperature and reheat gently in the oven at 300°F for about 8 minutes. Avoid microwaving too long, as it can make them rubbery.
You can also freeze unbaked biscuit dough. Cut the biscuits, freeze them solid, then bake straight from frozen, adding a few extra minutes to the bake time.
Always cool biscuits fully before storing to prevent moisture buildup and sogginess.

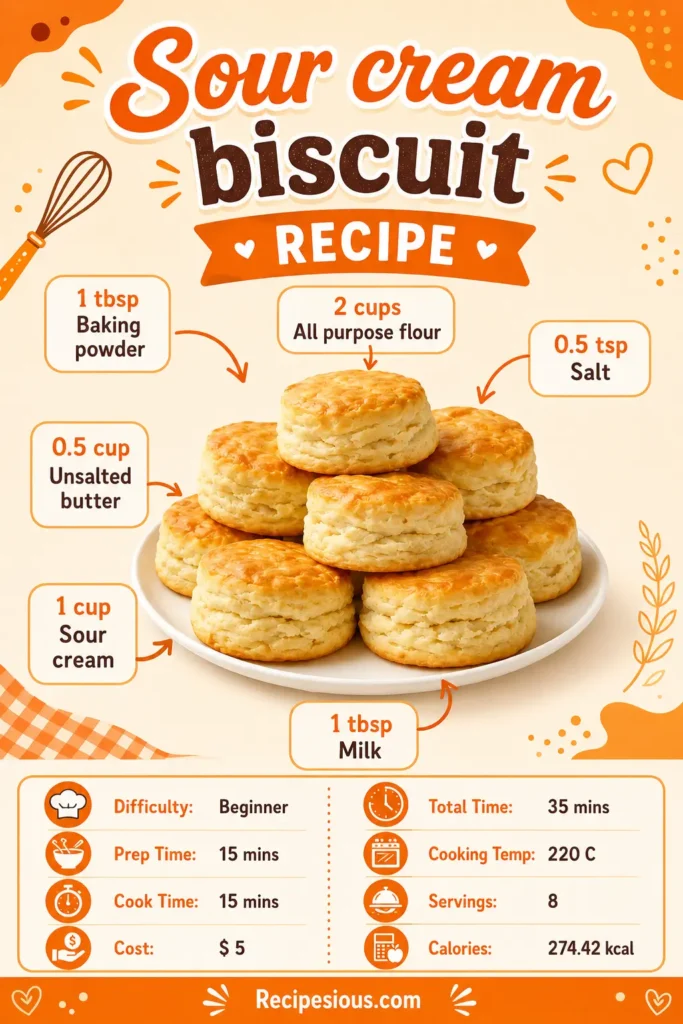
Sour cream biscuit recipe
Description
Soft, flaky sour cream biscuit recipe made with tangy sour cream and butter for tender layers and rich flavor, perfect for breakfast or alongside savory meals.
Ingredients


Instructions
Step 1: Heat the oven
Preheat your oven to 220 C. Line a baking sheet with parchment paper. I always do this first so the biscuits can go straight in once the dough is ready, cold dough is the secret to flaky layers.
Step 2: Mix the dry ingredients
In a large bowl, whisk together the flour, baking powder, and salt. Nothing fancy here, just make sure everything is evenly mixed so you don’t end up with salty pockets.
Step 3: Cut in the butter
Add the cold butter cubes to the flour mixture. Using your fingers or a pastry cutter, work the butter in until the mixture looks crumbly with some pea sized pieces left. I tested fully blending the butter once and the biscuits were fine, but not nearly as flaky, so leave those little chunks.
Step 4: Add the sour cream
Stir in the sour cream until the dough just starts to come together. It will look a little shaggy and that’s exactly what you want. If it feels dry, add milk one tablespoon at a time. Stop as soon as the dough holds together, overmixing is where biscuits go wrong.
Step 5: Shape the biscuits
Turn the dough out onto a lightly floured surface. Gently pat it into a rectangle about 2.5 cm thick. Fold it in half, then gently pat it out again. I usually repeat this fold once more, it creates those soft layers without turning the dough tough. Cut into rounds or squares, whatever feels easier that day.
Step 6: Bake
Place the biscuits on the baking sheet so they’re just barely touching. This helps them rise taller. Bake for 12 to 15 minutes until the tops are lightly golden and the sides look set. They should feel light when you pick one up.
Step 7: Cool slightly and serve
Let the biscuits cool for about 5 minutes before serving. They’re best warm, with butter melting into every little layer.
Nutrition Facts
Servings 8
- Amount Per Serving
- Calories 274.42kcal
- % Daily Value *
- Total Fat 17.45g27%
- Cholesterol 47.65mg16%
- Sodium 180.89mg8%
- Potassium 75.34mg3%
- Total Carbohydrate 25.68g9%
- Dietary Fiber 0.84g4%
- Sugars 1.16g
- Protein 4.1g9%
- Vitamin A 133.55 mcg
- Vitamin C 0.25 mg
- Calcium 166.22 mg
- Iron 1.66 mg
- Vitamin D 0.02 mcg
- Vitamin E 0.51 mg
- Vitamin K 1.52 mcg
- Vitamin B6 0.02 mg
- Vitamin B12 0.09 mcg
- Phosphorus 231.69 mg
- Magnesium 10.89 mg
- Zinc 0.33 mg
* Percent Daily Values are based on a 2,000 calorie diet. Your daily value may be higher or lower depending on your calorie needs.

Note
- Cold butter really matters here, if it starts melting, pop the dough in the fridge for 10 minutes.
- I tested low fat sour cream and the biscuits were noticeably drier, full fat is worth it.
- If your biscuits don’t rise much, check that your baking powder is still fresh.
- These freeze beautifully, bake them first, cool completely, then freeze and rewarm in the oven.
- For savory biscuits, I sometimes add a pinch of garlic powder or chopped herbs to the dough.
- Don’t twist the cutter when cutting rounds, press straight down for better rise.